Last Friday I participated in One Sheepish Girl's Valentine's Day Heart bomb. I've got some photos on instagram, and you can see more of the photos over on her blog (onesheepishgirl.com)
One of my heart patterns, the granny square heart, was picked up by Mollie Makes blog, so Hi to anyone new stopping by from there!
I've become a bit of a haphazard blogger, and still adjusting to our new year routine, Will probably have it sorted by Easter!
Showing posts with label heart. Show all posts
Monday, February 17, 2014
Friday, March 1, 2013
Granny Heart Squares {an update}
When I first published the pattern for these Granny Heart Squares I said I would update my progress as it was going to make up into a baby blanket for my friend. Confession: I haven't done much progress.
However since the pattern has been shared on the Mollie Makes blog, I have had a few people share their versions with me!
![]() |
Mazie Hutton from maziehutton.blogspot.com |
![]() |
Brenda Rhodes via Facebook page |
![]() |
Liz Croft via Facebook page |
![]() |
From Mollie Makes Facebook page |
And this big one has been sent off to Tasmania to be part of Woollies for Tassie:
I really love seeing the different ways the pattern has been interpreted, and seeing colours I may not have chosen myself.
I hope to get some time to finish my baby blanket soon. I have until June!
Emma
Sunday, February 10, 2013
{10 days of Hearts} Day 10: Line of Hearts
Final Day of my 10 part series, and this final project is a little different, because I have not made one... yet. As always I am browsing pinterest, finding new trends and ideas and I found this edging pattern from Rainbow Knits, A Line of Hearts. I asked if I could feature it and was very pleased when she said yes.
Pattern is available as a download, just click on the above link, or on the picture linked through pinterest.
Such a lovely idea, and I may be finishing off my granny heart baby blanket this way. It would also make a gorgeous scarf.
And this brings us to the end of the feature; 10 days of hearts. I hope you enjoyed! You can find all the links at any time under the 'hearts' washi tape button on the left of my blog, but here is a quick summary for you.
Day 1, Heart Ornament. Day 2, Granny's Heart. Day 3, Potholder. Day 4, Frilly Heart. Day 5, Lacey Heart. Day 6, Cross stitched Heart. Day 7, Danish Heart Basket. Day 8, Raspberry Glaze, Day 9, Sunburst Granny Heart. And Today's post is 10, A Line of Hearts.
Saturday, February 9, 2013
{10 Days of Hearts} Day 9. Sunburst Granny Hearts
The Sunburst heart is big and beautiful. I have used previously to make a wedding present for a friend. I also have one hanging on my wall! The pattern is from Bunny Mummy, click here to find the pattern.
The version on my wall uses thick 12ply yarn and a 6mm hook.
Please take a moment to have a look at Bunny Mummy's blog, she has a lot of great patterns, and has a great sense of colour! Find her at bunnymummy-jacquie.blogspot.com
The version on my wall uses thick 12ply yarn and a 6mm hook.
Please take a moment to have a look at Bunny Mummy's blog, she has a lot of great patterns, and has a great sense of colour! Find her at bunnymummy-jacquie.blogspot.com
Thursday, February 7, 2013
{10 Days of Hearts} Day 7. Danish Heart Basket
Did you ever fold these hearts out of card? I remember doing it!, Now you have a chance to crochet one!
Find the pattern here on Allison's blog. She also includes the assembly instructions which will work the same for a cardboard or paper version.
It looks quite complex, but is pretty easy to make up, so everyone will marvel at your talents!
Allison's blog is alipyper.com, And a big thanks to Allison for letting me share her pattern today!
Saturday, February 2, 2013
{10 Days of Hearts} Day 2: Granny's Heart
I use US terms, ch = chain, dc = double crochet, sl st = slip stitch
Start with this mini heart: (this also links to a stitch conversion chart if you need it!)
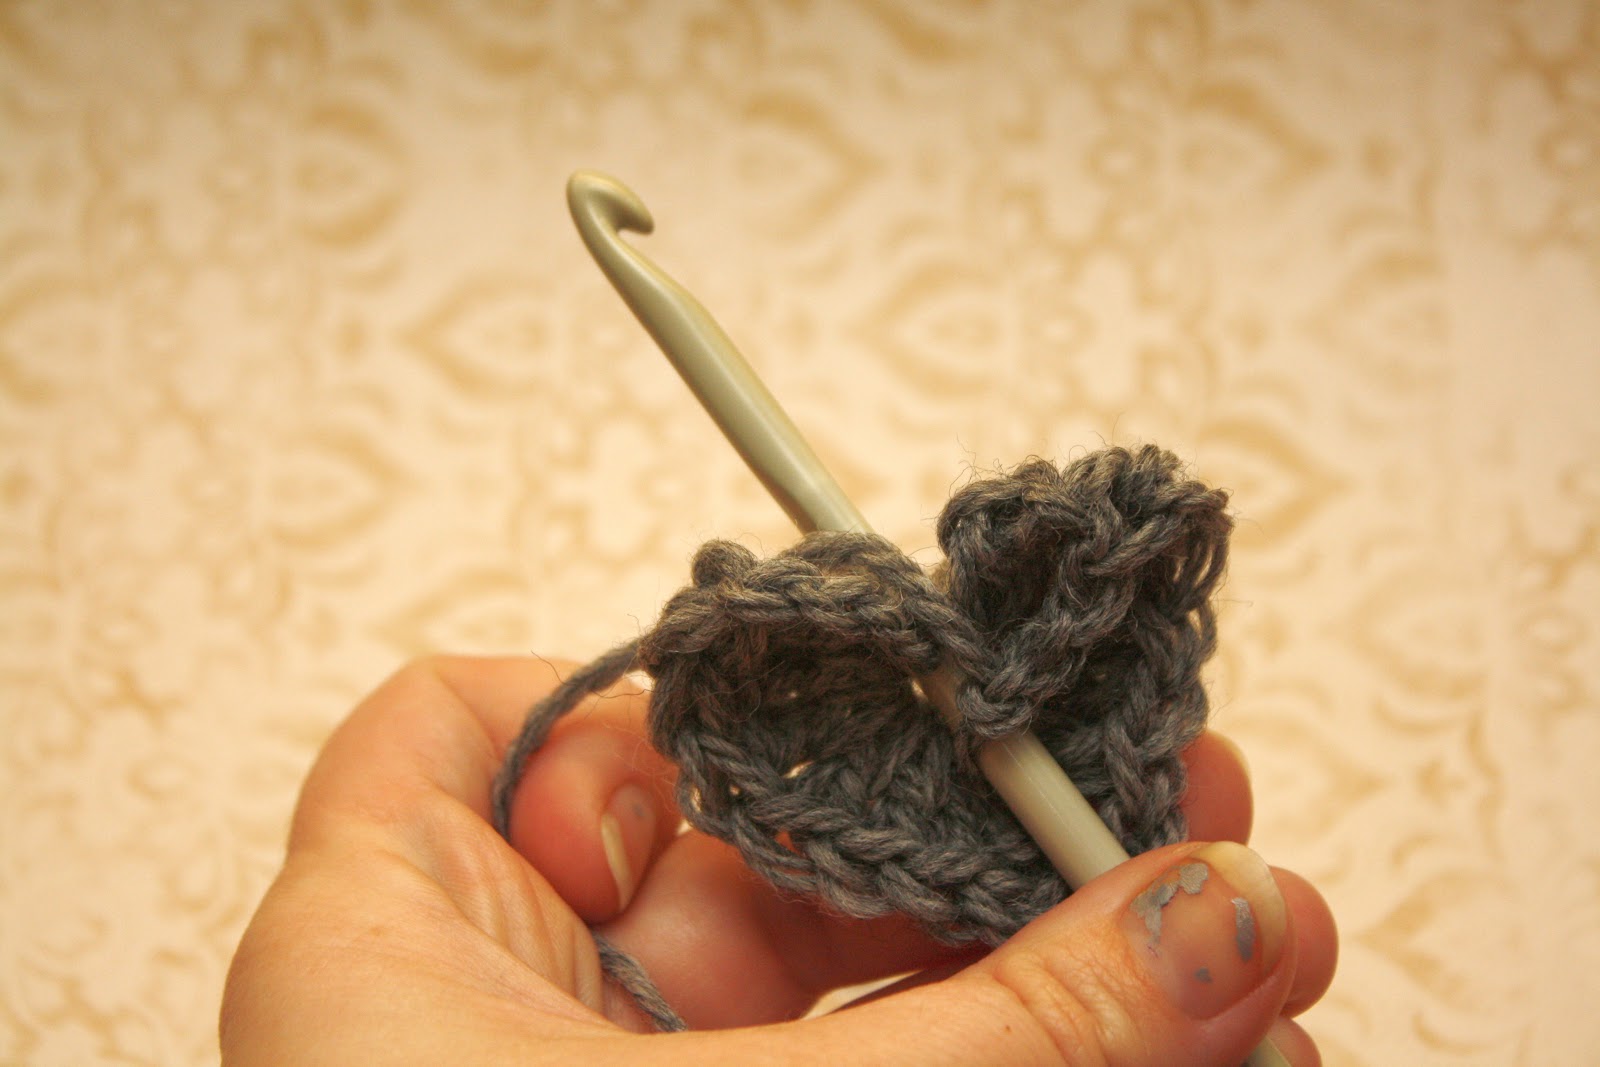
Insert the hook through the top of the left hand 'bump' marked with the star in the diagram, and pull a loop through
into this stitch, 3ch,2dc, 3ch, 3dc, 3ch
then skip the next 5 stitches, and into the next marked stitch: 3dc, 3ch,3dc,3ch.
skip the 3 stitches at the point of the heart, and into next marked stitch: 3dc, 3ch,3dc,3ch.
skip the next 5 stitches, and into the next marked stitch, 3dc, 3ch, 3dc and 2 ch, sl st back into 3rd chain from beginning.
Second round
Starting in any corner: 3ch, 2dc,3ch,3dc,1ch
into next space: 4dc,1ch
into next corner: 3dc,3ch,3dc,1ch
into next space: 4dc,1ch
into next corner: 3dc,3ch,3dc,1ch
into next space: 4dc,1ch
into next corner: 3dc,3ch,3dc,1ch
into next space: 4dc,1ch sl,st into top of 3rd chain.
And you'll have this square:
If you would like to keep going, you can build a larger square, but I am staying with this size, and will update when I have done more!
Friday, February 1, 2013
{10 Days of Hearts} Day 1. Heart Ornament
Valentine's Day is never a big celebration for me or my family, but it is nice to make a small thoughtful gift. That is the purpose of the feature I'm running for the next 10 days, small handmade, heartfelt gifts and decorations, one a day.
Today's heart project is a variation on an old post of mine; Mini Hearts. This time I'm starting with the magic ring method, and adding a loop to hang it up! I've noticed a few google searches on hearts with magic rings leading people to this blog, so I don't want to disappoint.
I use the US terms: ch = chain, dc = double crochet, tr = triple/treble crochet, sl st = slip stitch.
Magic Ring tutorial here
And if you would like the UK terms: starting with the magic ring, then chain 4,
Starting with the magic ring, then chain 4 (using US terms)
then 3 tr, 3 dc, 1 ch, 1tr, 1ch, 3dc, 3tr. all into the centre of the ring,
3 dtr, 3tr, 1ch, 1dtr, 1 ch, 3tr, 3 dtr, all into centre of ring
chain 4, Sl st in the centre,
then add 10 chains, and slip stitch back into centre and fasten off
click here for a more detailed tutorial on the heart.
hang them up inside, use as a gift tag, or even do a valentine's day yarnbomb!
Dont't forget to use the hashtag #10daysofcrochetaheart if you want to share something you have made. I would love to see!
click here for a more detailed tutorial on the heart.
hang them up inside, use as a gift tag, or even do a valentine's day yarnbomb!
Dont't forget to use the hashtag #10daysofcrochetaheart if you want to share something you have made. I would love to see!
Friday, January 25, 2013
10 Days of Hearts
Leading up to Valentine's Day I thought it would be nice to do a new mini feature. Each day for the first 10 days of February I will post a different heart themed craft. Not all will be crochet, but most will be simple, as I think Valentine's day should be about the sentiment and not about giving huge gifts. Unless that's your thing. I won't object :)
Some will be some old favourites, some new and some projects from other sites!
So stay tuned, and if you complete a project, why not share it on my Facebook page, or hashtag it on twitter or instagram with #10daysofcrochetaheart and we can all share the love :)
Monday, September 17, 2012
Make a Frilly Heart - add a picot!
A picot is a pretty way to make a frilly edge. It is very easy to do and uses just chains and slip stitches.
Using these instructions to make the heart. Picot stitch makes a sweet border to any crochet project.
Insert the hook where you want the first picot. I don't like to start too close to the centre, I like to start in the 3rd Chain along:
Pull a loop of yarn through the chain:
3 chains:
Slip Stitch back into same stitch you started with:
Slip Stitch into the next two chains. I've also shown the tail end getting stitched in, to save weaving in ends later on:
3 Chains:
3 chains and slip stitch back into centre of heart, 3 chains and slip stitch into starting chain. Fasten Off.
And there you have it! Add a chain if you want to make a hanging ornament.
Friday, August 24, 2012
{crochet} A Heart
I've been holding off on more heart patterns since the original post, because I wanted to cover all the stitches needed, and these hearts use a few of them!
Now that I have a tutorial made for each stitch, I can take you through it step by step. I have linked back to the appropriate stitches,, just in case you need to refresh your memory. I'm starting to abbreviate more, to ease you into pattern reading.
Today's heart is the same one round heart that was my first ever blog post (here), and also includes a second round. I'm using up some spare wool from my side walk shawl. Its always a good idea to keep spare bits and pieces and use them up in projects like this. I have edited the photos a little, because they were a little dark.
I am using 8ply pure wool and a 5mm hook
Slip Knot, you may want to leave a shorter tail than usual.
Chain 4
I am using 8ply pure wool and a 5mm hook
Slip Knot, you may want to leave a shorter tail than usual.
Chain 4
All of the first round worked into last chain, next to the tail.
Three Trebles (or Triples!) (tr)- US
or
Three Double Trebles (dtr)- UK
Then, three doubles (dc)- US
or
three trebles (tr) UK
into the same stitch.
Chain 1, tr 1, chain 1 (US)
or
Chain 1, dtr 1, chain 1 (UK)
All into same stitch
3 dc, 3 tr (US)
or
3 tr, 3 dtr (UK)
3 chains
Slip stitch into centre of heart. (that sounds a bit rough!)
Round one complete, fasten off if this is required size or continue on.
Round 2: Chain 3
in the first tr/dc from previous row:
sc and dc (both into same loop) US
or
dc and tr (into same loop) UK
into next loop:
3 dc (US)
or
3 tr (UK)
2 dc (US)
or
2 tr (UK)
1 dc into each of the next 4 (US)
or
1 tr into each of next 4 (UK)
ch 1, tr 1. ch 1 (US)
or
ch1, dtr 1, ch 1 (UK)
1 dc into each of next 4 (US)
or
1 tr into each of next 4 (UK)
2 dc into next loop, 3 dc into next one after that (US)
or
2 tr into next loop, 3 tr into next one after that (UK)
1 dc and 1 sc into next loop (US)
or
1 tr and 1 dc into next loop (UK)
3 chains
Slip Stitch into centre of heart.
Fasten off
And there we have it! A heart in two rounds.
Using the same pattern you can experiment with different yarn and hook sizes to see what you like best.
Thanks for visiting. let me know how you go!
Subscribe to:
Posts (Atom)