Showing posts with label crochet. Show all posts

Wednesday, June 24, 2015

Back loops and front loops!

Today I am redoing an older blog post, with a little editing! Back loops, front loops and chain spaces - where to put your hook. I will be posting some of the things that I am covering in at Crochet Club!


This is the back loop.


This is both loops. You may find that this is often the default place for the hook to go. If a pattern doesn't say anything, this is where the hook goes.


This is the front loop. 


Working in the back or front loop only creates a different drape, and allows loops to be left for surface crochet and other more advanced stitches


You don't always use the loops, you can also work into chain spaces. Granny squares for example, work through the space and not into individual loops.


We also can use the stitch post, and make front and back post stitches, they are a little more advanced, but I will cover them soon!

Wednesday, June 26, 2013

Popcorn Stitch Tutorial


It has been a while since I last post a tutorial! I have been making a hat using popcorn stitch. I'm really happy with how it is turning out. Popcorn stitch is a textured stitch, and quite an easy and effective.

Generally speaking, popcorn stitch is done with 5dc and not 4 like I have done. Truthfully I was trying to use less yarn!


To make one popped corn, 4 dc. (4 tr for UK)
 (The first popcorn of a round has 3ch and 3dc)


Remove hook from work. (While not necessary to pull a loop as large as  I have done, it does help if it is bigger than usual)


Hook through the top of the first dc then back into last hook, pull back to normal size


Yarn over hook and through both loops


In the hat I am making I am putting one chain in between each popcorn, and each row is worked into that chain space of the previous row.


I've been working on this hat for a while now. I'm joining in with Crafty Mummy to finish a UFO (unfinished object!) This is my UFO! and it should be finished very soon.

Friday, March 1, 2013

Granny Heart Squares {an update}


When I first published the pattern for these Granny Heart Squares I said I would update my progress as it was going to make up into a baby blanket for my friend. Confession: I haven't done much progress.

However since the pattern has been shared on the Mollie Makes blog, I have had a few people share their versions with me!

Mazie Hutton from maziehutton.blogspot.com

Brenda Rhodes via Facebook page
Liz Croft via Facebook page

From Mollie Makes Facebook page

 And this big one has been sent off to Tasmania to be part of Woollies for Tassie:


I really love seeing the different ways the pattern has been interpreted, and seeing colours I may not have chosen myself.

I hope to get some time to finish my baby blanket soon. I have until June!

Emma


Sunday, February 10, 2013

{10 days of Hearts} Day 10: Line of Hearts


Final Day of my 10 part series, and this final project is a little different, because I have not made one... yet.  As always I am browsing pinterest, finding new trends and ideas and I found this edging pattern from Rainbow Knits, A Line of Hearts. I asked if I could feature it and was very pleased when she said yes.

Pattern is available as a download, just click on the above link, or on the picture linked through pinterest.

Such a lovely idea, and I may be finishing off my granny heart baby blanket this way. It would also make a gorgeous scarf.


And this brings us to the end of the feature; 10 days of hearts. I hope you enjoyed! You can find all the links at any time under the 'hearts' washi tape button on the left of my blog, but here is a quick summary for you.

Day 1, Heart Ornament. Day 2, Granny's Heart. Day 3, Potholder. Day 4, Frilly Heart. Day 5, Lacey Heart. Day 6, Cross stitched Heart. Day 7, Danish Heart Basket. Day 8, Raspberry Glaze, Day 9, Sunburst Granny Heart. And Today's post is 10, A Line of Hearts. 

Saturday, February 9, 2013

{10 Days of Hearts} Day 9. Sunburst Granny Hearts

The Sunburst heart is big and beautiful. I have used previously to make a wedding present for a friend. I also have one hanging on my wall! The pattern is from Bunny Mummy, click here to find the pattern.

The version on my wall uses thick 12ply yarn and a 6mm hook.


Please take a moment to have a look at Bunny Mummy's blog, she has a lot of great patterns, and has a great sense of colour! Find her at bunnymummy-jacquie.blogspot.com


Thursday, February 7, 2013

{10 Days of Hearts} Day 7. Danish Heart Basket


Did you ever fold these hearts out of card? I remember doing it!, Now you have a chance to crochet one!

Find the pattern here on Allison's blog. She also includes the assembly instructions which will work the same for a cardboard or paper version.


It looks quite complex, but is pretty easy to make up, so everyone will marvel at your talents!

Allison's blog is alipyper.com, And a big thanks to Allison for letting me share her pattern today!


Saturday, February 2, 2013

{10 Days of Hearts} Day 2: Granny's Heart


Today's Heart project is a work in progress. I am making a baby blanket for a friend of mine. I've already made her a little pram blanket, but want to make her a big one too. this Granny square would also make a cute cushion cover.

I use US terms, ch = chain, dc = double crochet, sl st = slip stitch

Start with this mini heart: (this also links to a stitch conversion chart if you need it!)


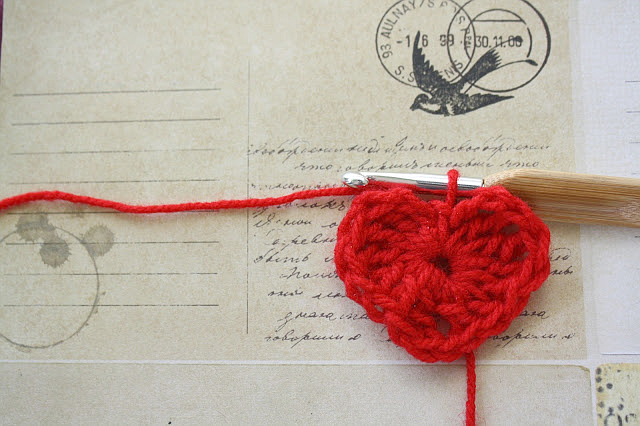
Insert the hook through the top of the left hand 'bump' marked with the star in the diagram, and pull a loop through
into this stitch, 3ch,2dc, 3ch, 3dc, 3ch
then skip the next 5 stitches, and into the next marked stitch: 3dc, 3ch,3dc,3ch.
skip the 3 stitches at the point of the heart, and into next marked stitch: 3dc, 3ch,3dc,3ch.
skip the next 5 stitches, and into the next marked stitch, 3dc, 3ch, 3dc and 2 ch, sl st back into 3rd chain from beginning.


Second round
Starting in any corner: 3ch, 2dc,3ch,3dc,1ch
into next space: 4dc,1ch
into next corner: 3dc,3ch,3dc,1ch

into next space: 4dc,1ch
into next corner: 3dc,3ch,3dc,1ch

into next space: 4dc,1ch
into next corner: 3dc,3ch,3dc,1ch
into next space: 4dc,1ch sl,st into top of 3rd chain.


And you'll have this square:


If you would like to keep going, you can build a larger square, but I am staying with this size,  and will update when I have done more!

Friday, February 1, 2013

{10 Days of Hearts} Day 1. Heart Ornament


Valentine's Day is never a big celebration for me or my family, but it is nice to make a small thoughtful gift. That is the purpose of the feature I'm running for the next 10 days, small handmade, heartfelt gifts and decorations, one a day.

Today's heart project is a variation on an old post of mine; Mini Hearts. This time I'm starting with the magic ring method, and adding a loop to hang it up! I've noticed a few google searches on hearts with magic rings leading  people to this blog, so I don't want to disappoint.

I use the US terms: ch = chain, dc = double crochet, tr = triple/treble crochet, sl st = slip stitch.

Magic Ring tutorial here


Starting with the magic ring, then chain 4 (using US terms)
then 3 tr, 3 dc, 1 ch, 1tr, 1ch, 3dc, 3tr. all into the centre of the ring,
chain 4, Sl st in the centre,


then add 10 chains, and slip stitch back into centre and fasten off


And if you would like the UK terms: starting with the magic ring, then chain 4,
3 dtr, 3tr, 1ch, 1dtr, 1 ch, 3tr, 3 dtr, all into centre of ring 
chain 4, Sl st in the centre, 
then add 10 chains, and slip stitch back into centre and fasten off

click here for a more detailed tutorial on the heart. 


 hang them up inside, use as a gift tag, or even do a valentine's day yarnbomb!


Dont't forget to use the hashtag #10daysofcrochetaheart if you want to share something you have made. I would love to see!

Wednesday, January 16, 2013

Woollies for Tassie - part 2


I've been really enjoying crocheting for a purpose, other than the usual purpose of having fun! I have been making 8" squares to send to Tasmania (see this previous post)

I've made a few of the traditional granny squares, but wanted to make a few extra fancier ones.

You might remember last year (well, a couple of months ago!) I made this:


I absolutely love this pattern, and had a few circles left over, perfect to use! but they do need to be bigger!


The pattern is called Flowers in the Snow by Solveig. You will need to visit her page to get the first three rounds. 

Round 4: in any chain space: 3 ch, 3dc (UK tr), 1 ch, *4 dc in next chain space, 1 ch. Repeat from *10 more times and sl st into 3rd chain from beginning  
{4dc in each space, separated by a chain}

Round 5: in any chain space: 3 ch, 1dc, 1 ch, 2dc, 2ch. *2dc into next chain space 1 chain and 2dc (into same chain space) 2 chains. Repeat from * 10 more times and sl st into 3rd chain from beginning. 
{2dc, 1ch, 2dc into each space, separated by 2 chains}

Round 6: into large chain space (space made by 2 chains) 3ch 3dc 1ch, 1dc into small chain space, 1ch, *4 dc into next large chain space, 1 ch, 1dc into nect small chain space. repeat from * 10 more times and sl st into 3rd chain from beginning
{4dc into large space, 1dc into each small space, each separated by 1ch}

Round 7: starting the corner
Starting in any space to the right  of the single dc
4ch and 1tr, 5ch and into next space; 2 tr.
3ch, *2dcinto next space, 1ch, 2dc into next space 3ch, 2dcinto next space, 1ch, 2dc into next space 3ch
+ 2tr into next space 5ch 2tr into next sp 3ch 
Repeat from * two times, and then repeat from * a third time and finish at +. Sl st to join.


Round: 8:
Starting in the corner space, 3ch and 2dc, 3ch, 3dc
*1 ch, 4dc into next sp, 3ch, 4dc into next space, 3chain, 4dc into next space, 3ch, 4dc into next sp, 1ch
+3dc, 3ch, 3dc in next space, repeat from * two times, and then repeat from * a third time and finish at +. Sl st to join.


Round 9:
Starting in the corner space, 3ch and 2dc, 3ch, 3dc
*2ch, 2dc into next sp, 3ch, 5dc into next sp, 3ch, 5dc into next sp, 3ch, 2dc into nect sp, 2ch
+3dc 3ch 3dc into next space. repeat from * two times, and then repeat from * a third time and finish at +. Sl st to join.


I have used a 4mm hook with 8ply yarn. If you are going to send to Woollies for Tassie, they are asking for 8ply yarn, either wool or acrylic but please label it. For more info, please go to the Craft Hive


Katie's Nesting Spot
I've linked up with:

Friday, January 11, 2013

Woolies for Tassie - granny squares


You may have heard of the devastating fires in Tasmania. The Craft Hive has set up a drive to get knitted and crocheted square together to make blankets for the families that have lost everything.

If you are unable to participate, maybe you can spread the word to someone who can.  


They are after 8 inch squares in 8 ply yarn. Acrylic, wool, or blended, but please label them. 

for more information, click here: The Craft Hive 

I'm going to be sending some granny squares, here is a pattern for an 8 inch square if you need it: (using US terms) I've posted other Granny Square tutorials, but this is now my favourite method. (note, you don't need to use this pattern, if you are sending them off, any 8inch square will do)
(US dc = UK tr) 


I'm using the aforementioned 8 ply yarn with a 4 mm hook.
Start with either a magic loop or chain 4 and join with sl st in first chain, (using the red yarn.)

1st round: chain 6 (counts as 1 dc and 3 chains-pictured above) 
*3 dc into centre and 3 chains. repeat from * two more times
2dc into centre and slip stich into top of third chain from beginning.

1st Round Complete
2nd round: 6 chains, and into same corner space 3dc and 2 chains {this square has a 2 space gap between each 3 dc cluster and a 3 chain gap in each corner}
*3 dc, 3 chains, 3dc, 2 chains into next corner space. repeat from * two more times
2dc into first corner space and sl st into 3rd chain. Fasten off.


3rd round (using brown yarn): 6 chains, then into same corner space 3dc and 2 chains
*3dc into next space, 2 chains
3dc into next corner space, 3 chains, 3dc into same corner space, 2 chains. Repeat from * 2 more times
2dc into first corner space, sl st into 3rd chain. fasten off

3rd Round Complete

4th round (using red yarn): 6 chains, then into same corner space 3dc and 2 chains (pictured below)

Corner Detail. Start each round off like this to avoid a bulky join. 

*3dc into next space, 2 chains, 3dc into next space, 2 chains.
3dc into next corner space, 3 chains, 3dc into same corner space, 2 chains. Repeat from * 2 more times
2dc into first corner space, sl st into 3rd chain.


5th round: 6 chains, then into same corner space 3dc and 2 chains
*3dc into next space, 2 chains. 3dc into next space, 2 chains. 3dc into next space, 2 chains.
3dc into next corner space, 3 chains, 3dc into same corner space, 2 chains. Repeat from * 2 more times
2dc into first corner space, sl st into 3rd chain. Fasten off.

5th Round Complete
6th round: (using brown yarn) 6 chains, then into same corner space 3dc and 2 chains
*3dc into next space, 2 chains. repeat 3 more times
3dc into next corner space, 3 chains, 3dc into same corner space, 2 chains. Repeat from * 2 more times
2dc into first corner space, sl st into 3rd chain. Fasten off

7th round: (using red yarn) 6 chains, then into same corner space 3dc and 2 chains
*3dc into next space, 2 chains. repeat 4 more times
3dc into next corner space, 3 chains, 3dc into same corner space, 2 chains. Repeat from * 2 more times
2dc into first corner space, sl st into 3rd chain.

8th round: 6 chains, then into same corner space 3dc and 2 chains
*3dc into next space, 2 chains. repeat 5 more times
3dc into next corner space, 3 chains, 3dc into same corner space, 2 chains. Repeat from * 2 more times
2dc into first corner space, sl st into 3rd chain. Fasten off

8 Rounds Complete
 Make a square in just one colour, or change at each row. Play around and you will end up with quite a few squares to donate.

Here is my other post on Granny Squares, but note this method uses a 3 chain gap between each 3 dc cluster. It does have a more detailed explanation of starting the first round. There is no right or wrong way to make a Granny Square, but you may need to adjust tension or add/subtract rows to get to an 8" square. As I said before, I now prefer the method in today's post.


Thanks for reading,
Emma

Thursday, December 13, 2012

Joining as you go {tutorial}


Been a little while since I did a tutorial, here is an easy method to join motifs as you go, which reduces the amount of weaving in ends later! (hooray!)

This method should work for any motif, with a little planning. It helps if there is a chain space to work into where you join.

I used this free pattern for a for a flower coaster This tutorial is just for this particular technique, not a walk through the whole pattern :) The instructions are a little vague as it is intended to use on any motif.

What you need is two completed motifs (referred to as motif A and B- in green) ,and one that is one round from completion. (motif C -pink)

Work the final round of the motif  C until you reach the chain space gap that you are joining. Place hook through gap of motif A. Then complete chain and continue pattern.


There you have one join! Continue to next chain space and repeat, by placing hook into chain space of motif A.


Continue final row until to reach the point where you are joining motif B. Place hook into the chain space before completing the chain


And then we have three joined motifs! Saves a lot of time and effort if you are planning on joining them later on!
And the final result:


I'm hanging up these for Christmas! so I'm also adding a chain, with slip stitches into each of the top bumps. I did 12 chains between each motif and 7 between the 'bumps'. 


Enjoy!, I should get some photos up of them hung around the house! 

Emma xx